In your Control Panel, navigate to the Email Manager module, click on “Create Account,” and assign an email address and a password. Complete the process by clicking the “Create” button.
In the Email Manager, under “Action,” select “Change password” to set a new password for email accounts.
In the Email Manager, navigate to General Settings, and under the Catch-All settings, specify how to handle incoming emails sent to non-existent accounts.
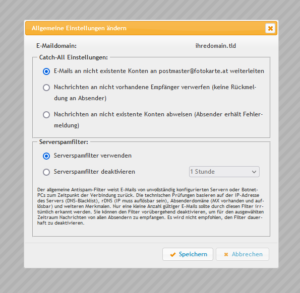
In the Email Manager Control Panel module, under General Settings, you can specify whether to enable or disable the server spam filter.
The storage space of your hosting package will be distributed among all existing email accounts. In the Email Manager Control Panel module, you can view the resource consumption of each account.
In the “Email Manager” control panel module, you can configure email delivery settings under “Action” and “Mailbox settings.”
- Use spam filter for this account: This option allows you to enable or disable the spam filter for this email account.
- If the spam filter is not active, and you uncheck “Save to this account,” you will be presented with a new setting option: “I understand and confirm that all emails will be deleted.” If this option is active, all received emails will be deleted immediately.
- If the spam filter is active, the “White- and Blacklist” menu item is also available.
- File in this account: Messages can either be deleted immediately (Delete) or filed within the account.
- Forward to: You can enter email addresses to which incoming messages will be forwarded.
In the “Email Manager” control panel module, you can activate the autoresponder under “Action” and “Mailbox settings.”
You can set the text, start time, and expiration time for the autoresponder.
Under this menu item, you have the option to create, modify, and delete aliases for your account. An alias is an email pseudonym for your existing email address. All emails sent to your alias email address will be directed to the mailbox of your primary, pre-existing email address.
In the Control Panel module “Email Manager,” you can either delete all emails or delete emails from a specific time period under “Action” -> “Delete.”
In the Control Panel module “E-Mail Manager,” you can delete an email account under “Action” and “Delete.”
The “Mail Logs” function in the Email Manager of your Control Panel allows you to view the history of your incoming and outgoing emails and determine whether they were successfully transmitted or encountered errors. Here you will find simple instructions on how to use this feature:
Select log type: Select the desired log type. You can choose between Spamdyke, SpamAssasin or a combination of both (All).
- Spamdyke: Spamdyke checks the configuration of the sending mail server, including DNS settings and blacklist/whitelist entries. Incorrect configurations lead to the rejection of e-mails. The Spamdyke server filter can be managed in the general settings of the Email Manager.
- SpamAssasin: SpamAssasin evaluates incoming messages based on various criteria and awards points. The more points, the more likely it is spam. These criteria are continuously updated. Messages that have been checked by SpamAssasin but not marked as spam are given a green status with a number and abbreviations.
Successful e-mail traffic: The status “ALLOWED” means that an e-mail was successfully delivered and there is no reason for rejection. A green status with number and abbreviations indicates that SpamAssasin has checked the message but has not detected it as spam.
Errored e-mail traffic: The status “DENIED” indicates that an e-mail could not be delivered due to an error.
Errors when sending a message: Common causes are incorrectly configured email clients. Please check the setup according to the instructions. “DENIED_OTHER” means that the email was sent without SMTP authentication. “DENIED_IDENTICAL_SENDER_RECIPIENT” indicates that sender and receiver are identical, which can be fixed by enabling SMTP authentication.
Error while receiving a message: “Error messages with Y 1-X” indicate that the message was detected as spam by SpamAssasin. Click on the red texts for explanations. “DENIED_RDNS_MISSING” means missing rDNS record at the sender server, “DENIED_RDNS_RESOLVE” an invalid rDNS record and “DENIED_SENDER_NO_MX” missing MX record.
The mail logs allow you to monitor your domain’s email traffic and identify any problems.
Outlook 2019 IMAP account
Outlook 2019 Mail Setup
Preparation:
Before setting up in Outlook, logging into the webmail for the first time is important. This ensures that the default email directories are created. This ensures smooth functionality in Outlook.
To access it, simply type your domain in the browser line and add “/up”. For example: pattern.at/up.
-
Open Outlook: Launch Microsoft Outlook 2019 on your computer.
-
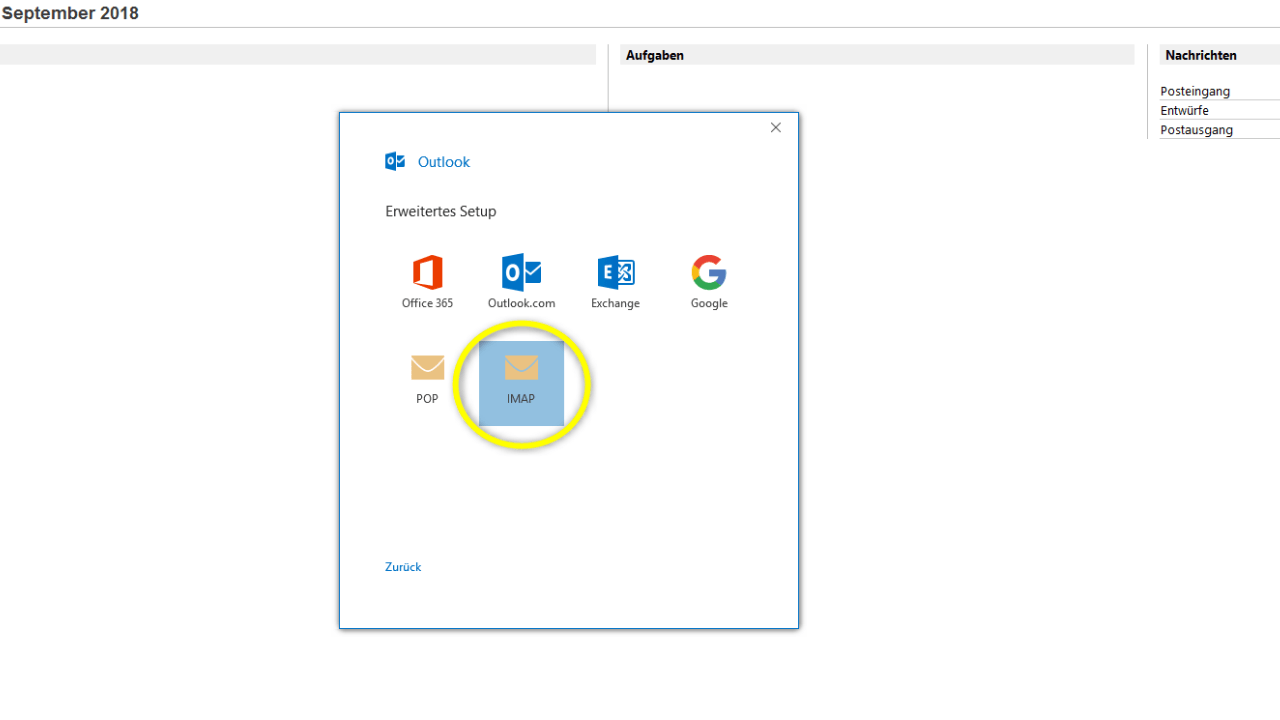
Add account:
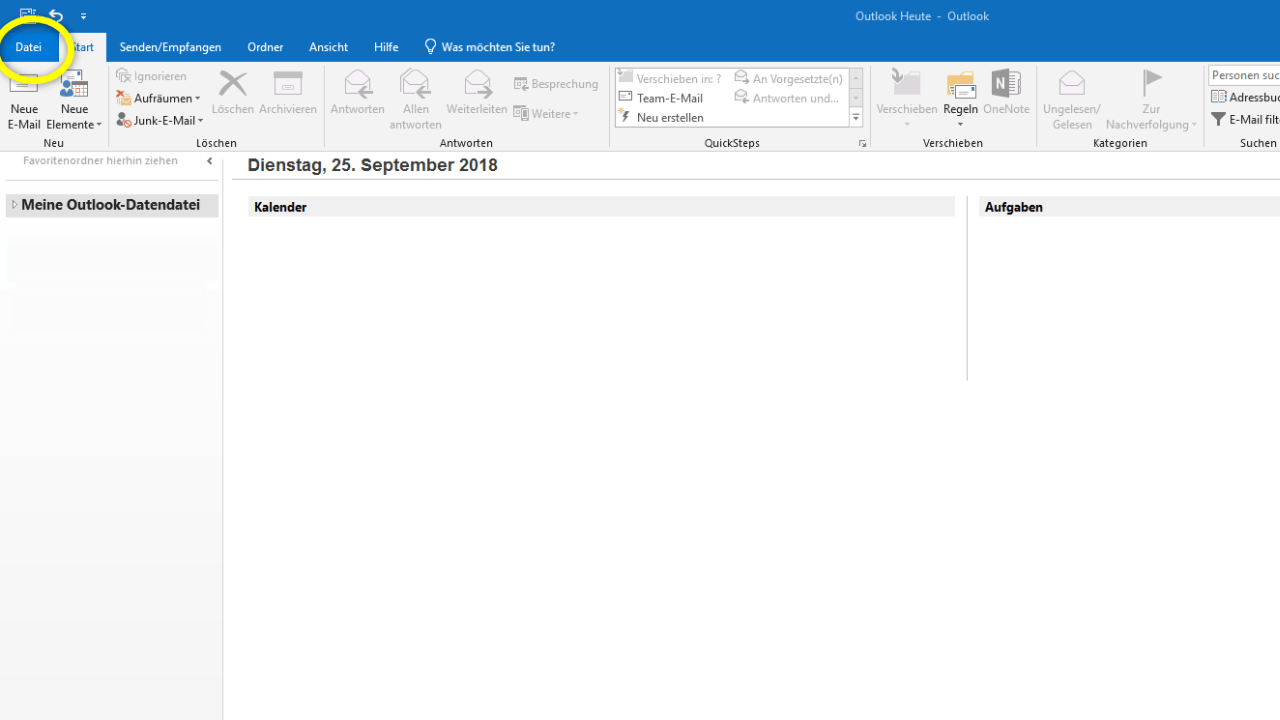
- If you are using Outlook for the first time, click on “File” > “Add account”.
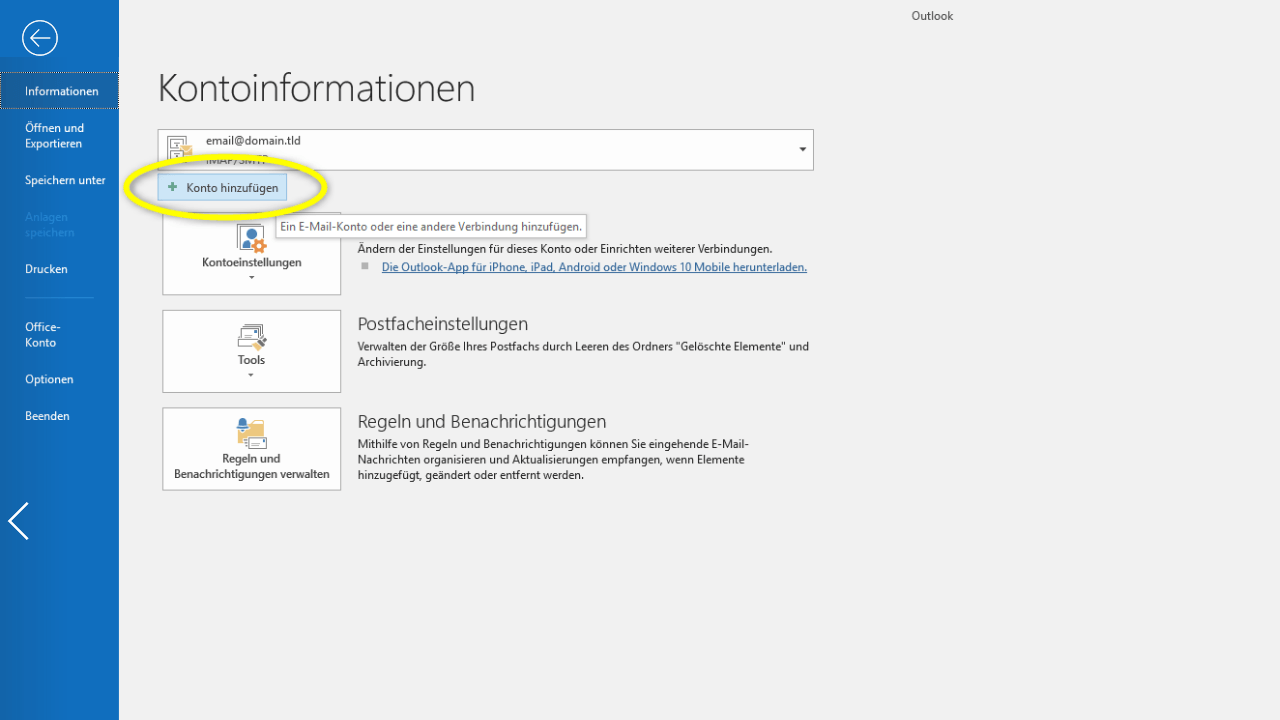
- If you have already set up an account, go to “File” > “Account Settings” > “Account Settings”. In the window that opens, select “New”.
-
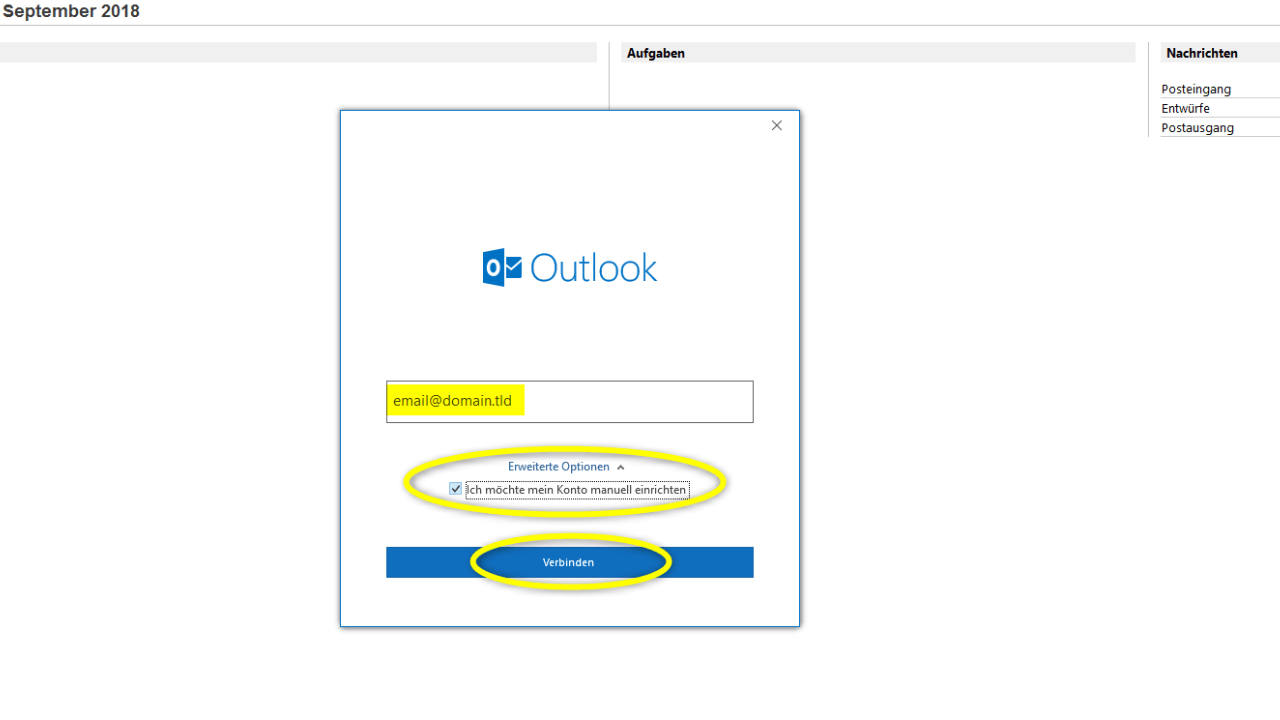
Enter account information: Enter your email address and then click “Advanced Options” and check “I want to set up my account manually”. Then click on “Connect”.
-
Select account type: Select “IMAP” as the account type.
-
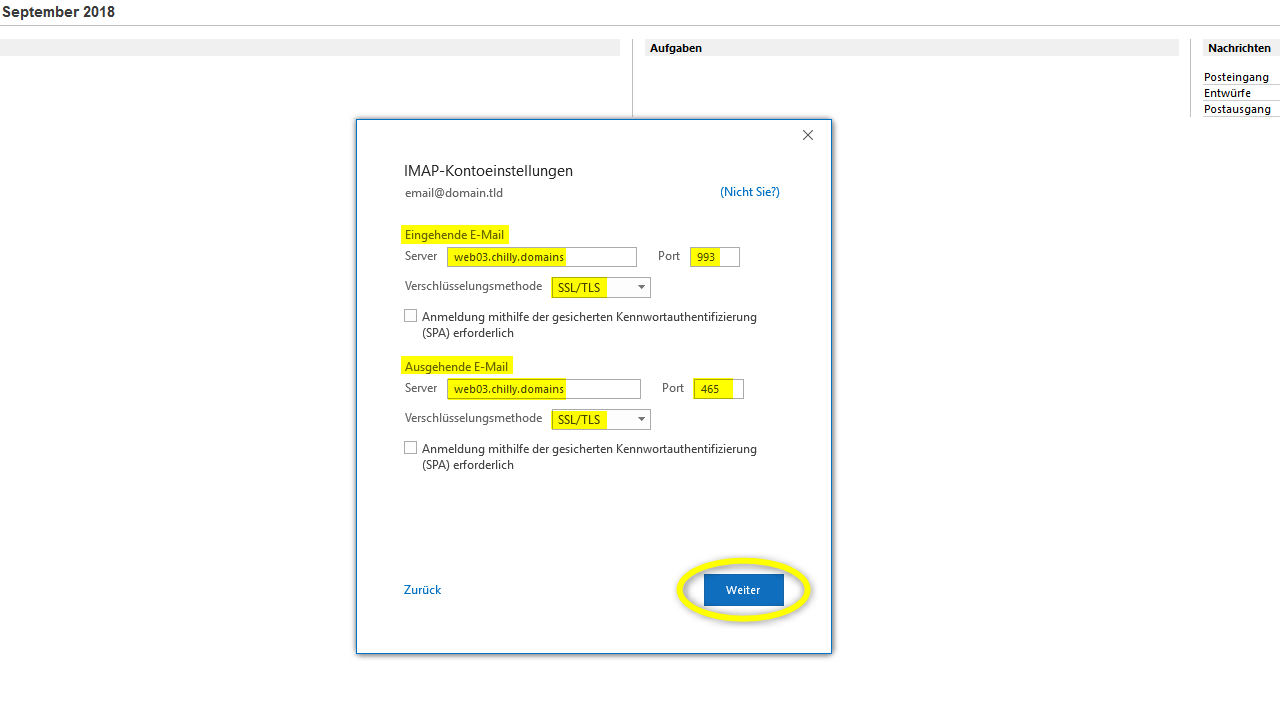
Enter server information:
You can get the email settings needed for this step from Internet Tools.
Please note: The settings shown in the screenshot differ from the server data you need!- Incoming email: Enter the IMAP server settings. These include
- the server name(get it here)
- the port (993)
- the encryption method (SSL/TLS)
This information should be provided by your email provider. - Do not enable “secured password authentication (SPA)”.
- Outgoing email (SMTP): Enter the appropriate information for the outgoing server here:
- Server name(get here)
- Port (465)
- Encryption method (SSL/TLS)
- Incoming email: Enter the IMAP server settings. These include
-
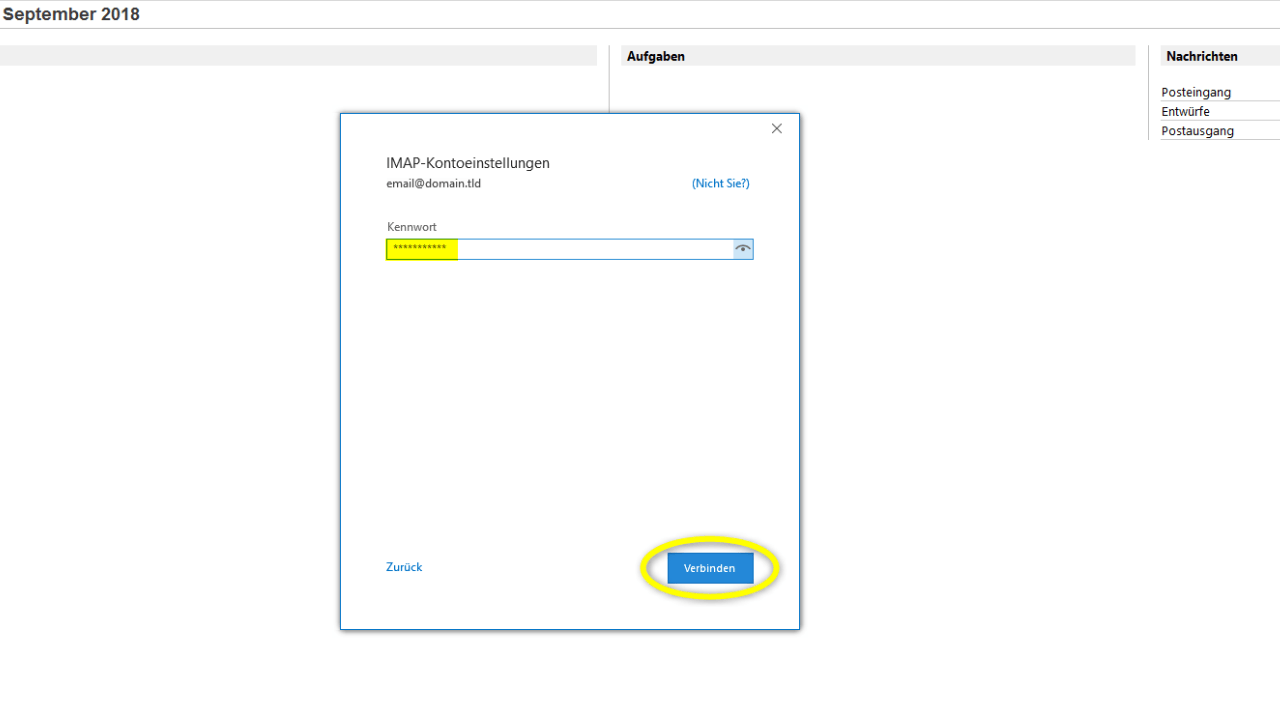
Log in: Enter your email address password when prompted, and then click Connect.
-
Completing the setup: If all information has been entered correctly, Outlook should be able to establish a successful connection. You will see this in the message that the account has been successfully created.
-
Testing the account: To verify that everything is working, send a test email from your new account and/or send a test email to your new account.
Windows 11 Mail Setup
Windows 11 Mail Setup
Preparation:
Before setting up Windows 11 Mail, logging into the webmail for the first time is important. This ensures that the default email directories are created. This ensures smooth functionality of Windows 11 Mail.
To access it, simply type your domain in the browser line and add “/up”. For example: pattern.at/up.
-
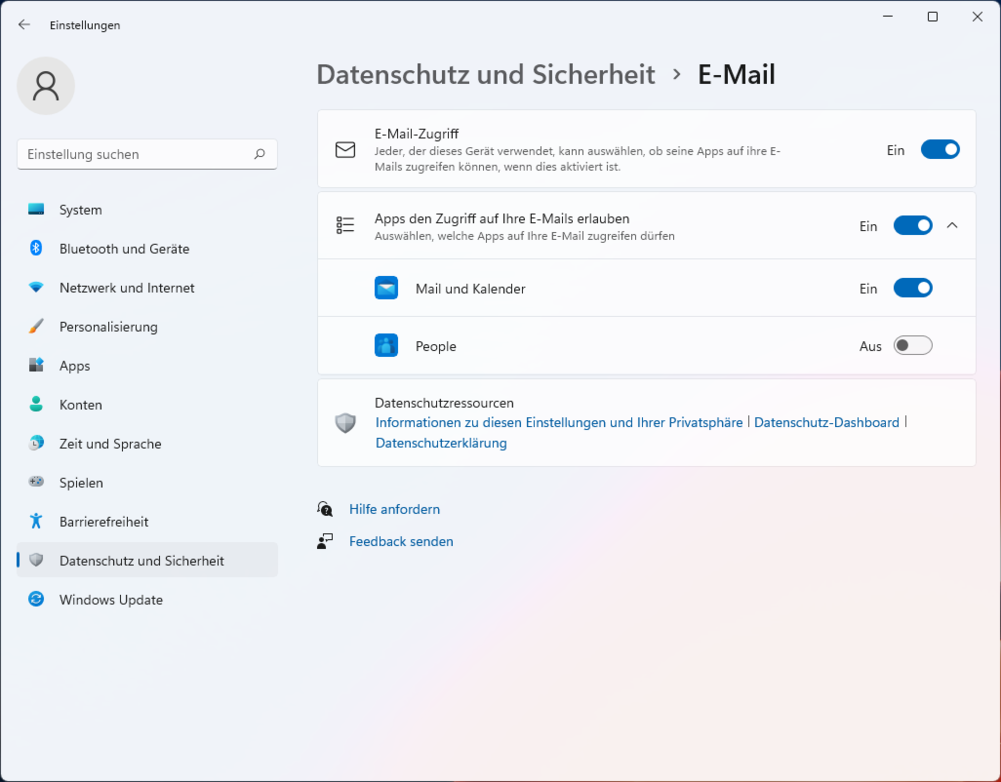
Customize email privacy: Before you set up your IMAP email account in the Windows 11 Mail app, it is important to customize your email privacy settings. To do this, proceed as follows:
- In the Mail app, click the gear icon (Settings) at the top left.
- Select Privacy or Account Settings, depending on how the option is named in your version of the Mail app.
- Check the privacy settings to make sure they match your preferences. Here you can specify, for example, how often emails are synchronized and how long they remain stored on your device.
Once you have customized your privacy settings, you can proceed with setting up your IMAP email account as described in the following steps:
-
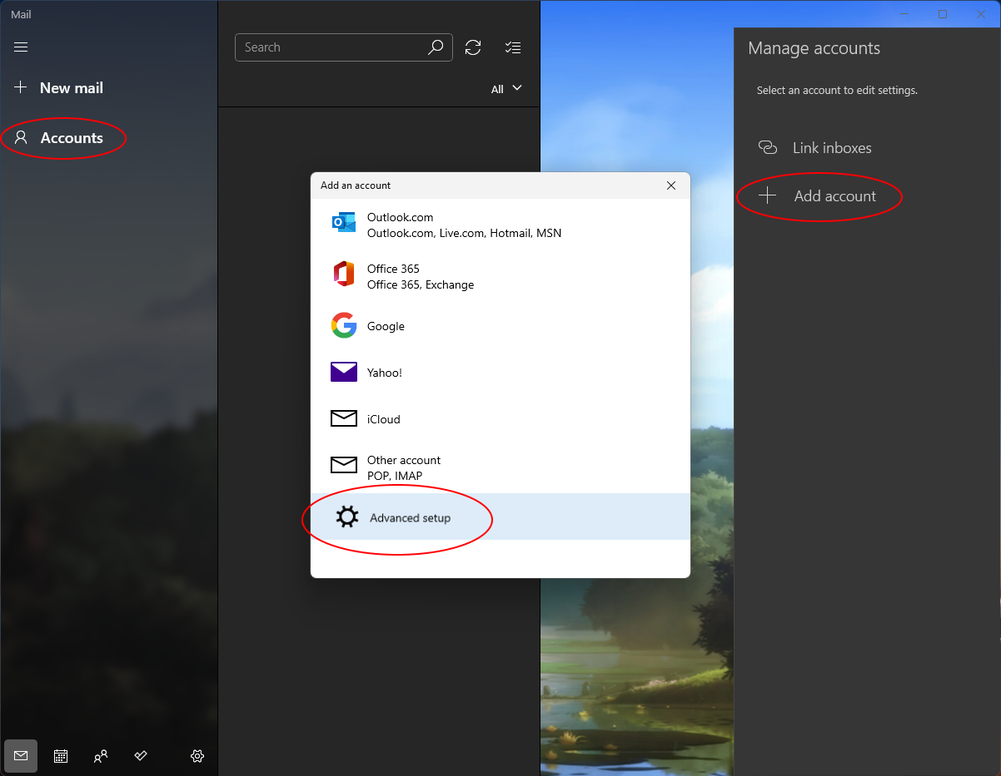
Click the Windows icon (Start menu) in the lower left corner of your screen to open the Start menu.
-
Search for“Mail” and click on the Mail app to open it.
-
In the Mail app, click the gear icon (Settings) in the upper left corner.
-
Click on“Accounts” in the settings window.
-
Click on“Add account“.
-
Select“Advanced Setup“.
-
Select“Internet e-mail“.
-
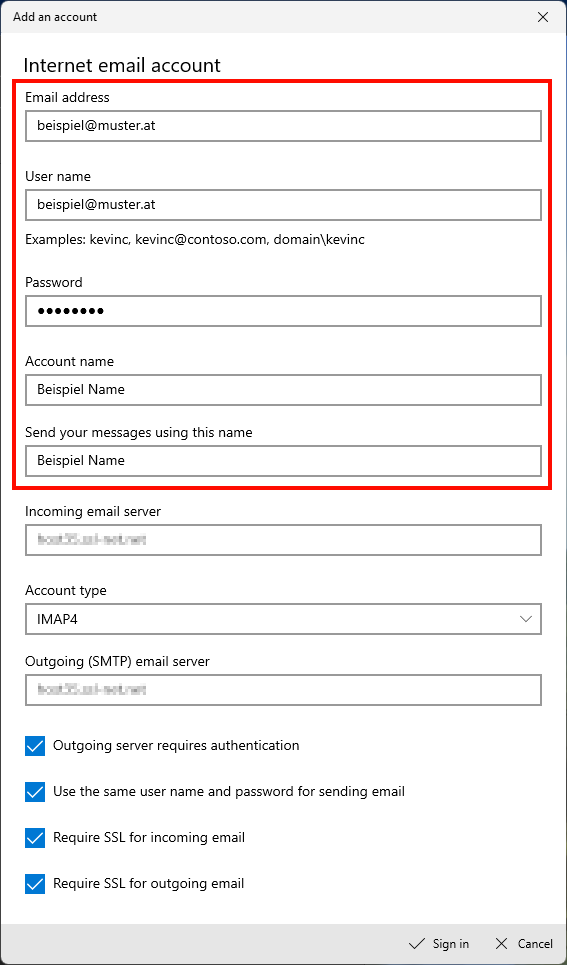
Now you need to enter the following information:
- E-mail address: Enter your full email address.
- Benutzername: Geben Sie Ihren Benutzernamen ein, den Sie für Ihr E-Mail-Konto verwenden.
- Password: Enter the password for your email account.
- Account type: Select “IMAP4”.
-
You can get the email settings needed for this step from Internet Tools.
-
- Incoming email: Enter the IMAP server settings. These include
- the server name(get it here)
- the port (993)
- the encryption method (SSL/TLS)
This information should be provided by your email provider. - Do not enable “secured password authentication (SPA)”.
- Outgoing email (SMTP): Enter the appropriate information for the outgoing server here:
- Server name(get here)
- Port (465)
- Encryption method (SSL/TLS)
- Incoming email: Enter the IMAP server settings. These include
-
-
ClickTest Account Setup to make sure the settings are correct. The Mail app will connect to your account and check the settings.
-
After the connection has been successfully established, click“Next“.
-
You can then make settings for the account name and synchronization options. Make sure that “Email” is enabled if you want to synchronize your emails.
-
Click “Sign in” to add the account.
Please note that the exact steps and options may vary slightly depending on your email provider. Make sure you are using the correct IMAP and SMTP server information from your email provider.
iPhone Apple Mail Setup
iPhone Apple Mail Setup
Preparation:
Before setting up Apple Mail, logging into webmail for the first time is important. This ensures that the default email directories are created. This ensures smooth functionality of Apple Mail.
To access it, simply type your domain in the browser line and add “/up”. For example: pattern.at/up.
- Open Settings: Go to Settings on your iPhone by tapping the gear icon on your home screen.
- Swipe down: Scroll down in Settings and look for the “Mail” option (on older iOS versions, it might be “Mail, Contacts, Calendar”). Tap on it.
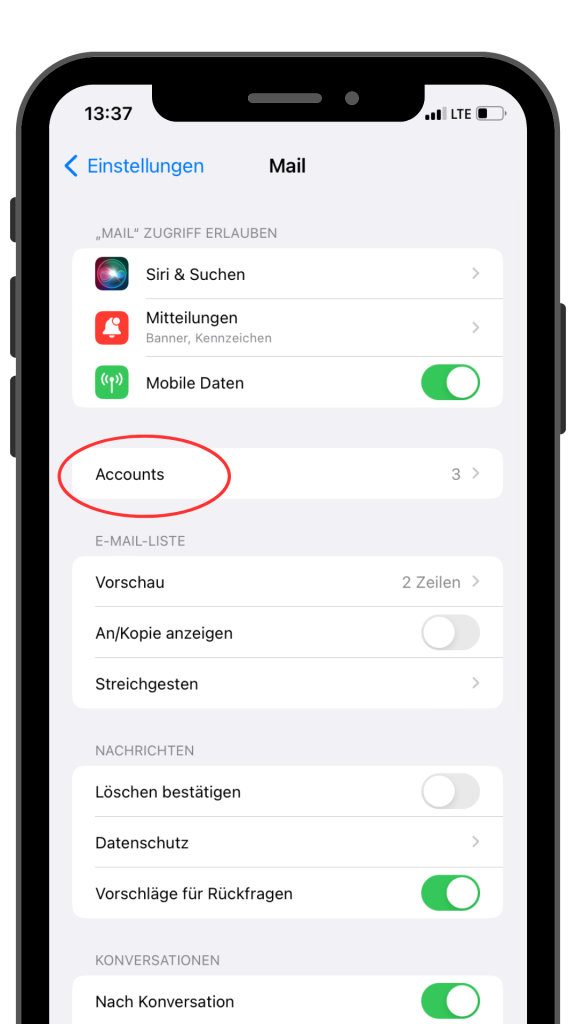
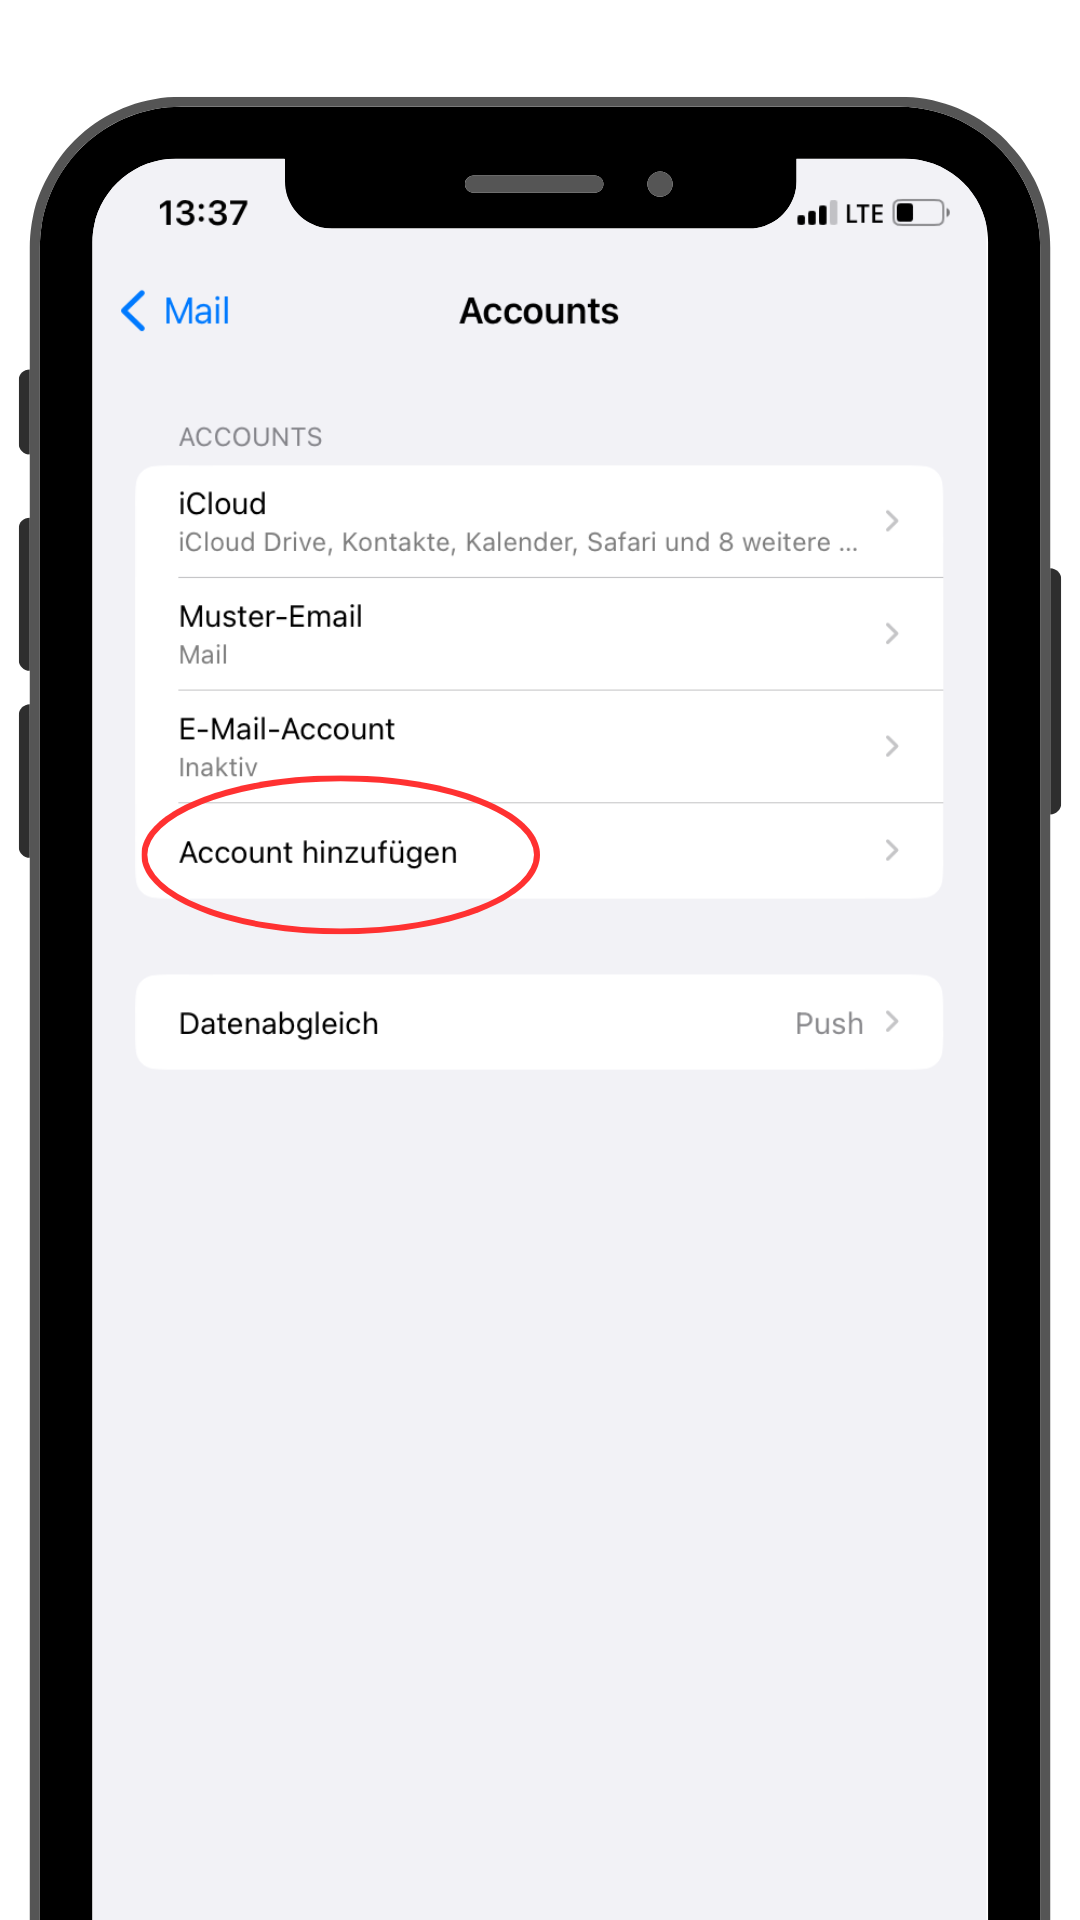
- Account: Select “Accounts” or “Accounts & Passwords” depending on which version of iOS you are using.
- Add account: Tap on “Add account”.
- Select email provider: You will see a list of different email providers like iCloud, Google, Yahoo, etc. Select “Other” as we will set up an IMAP account.
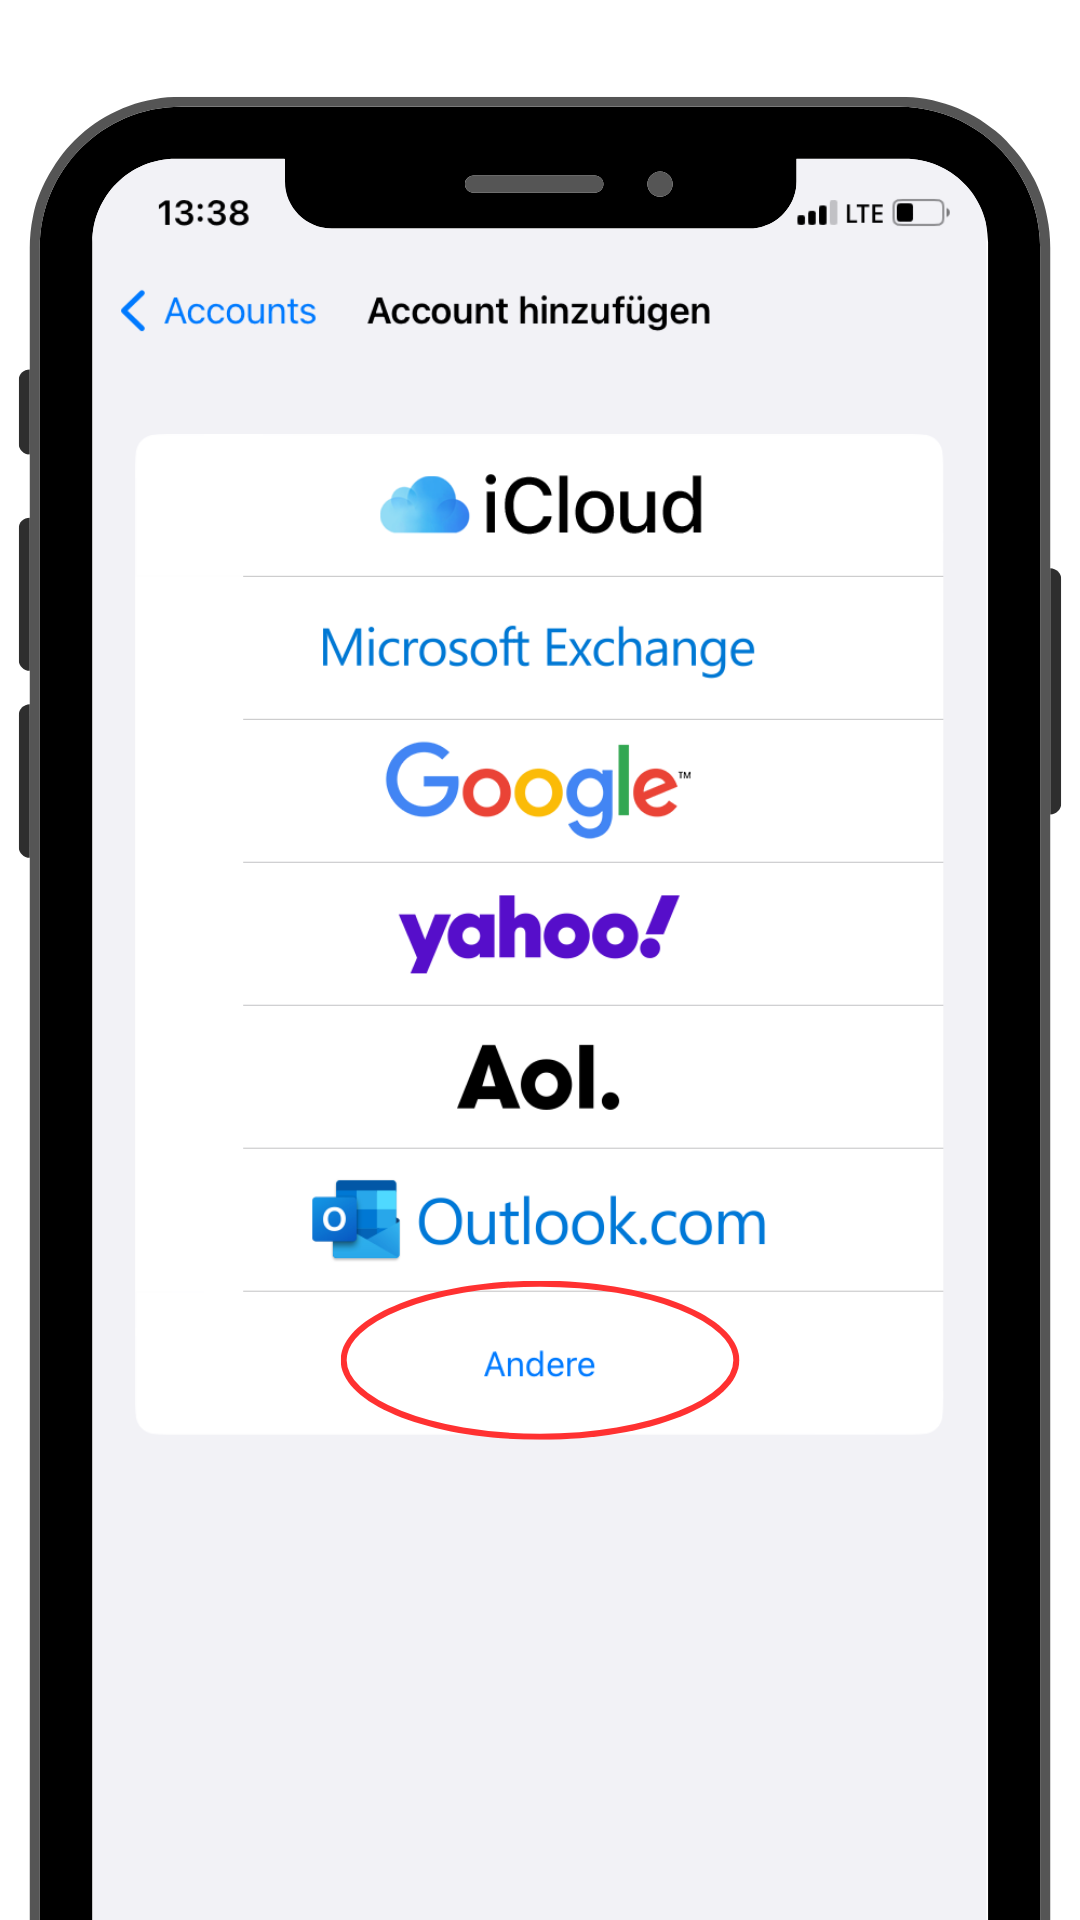
- Add new account: Select “Add mail account”.
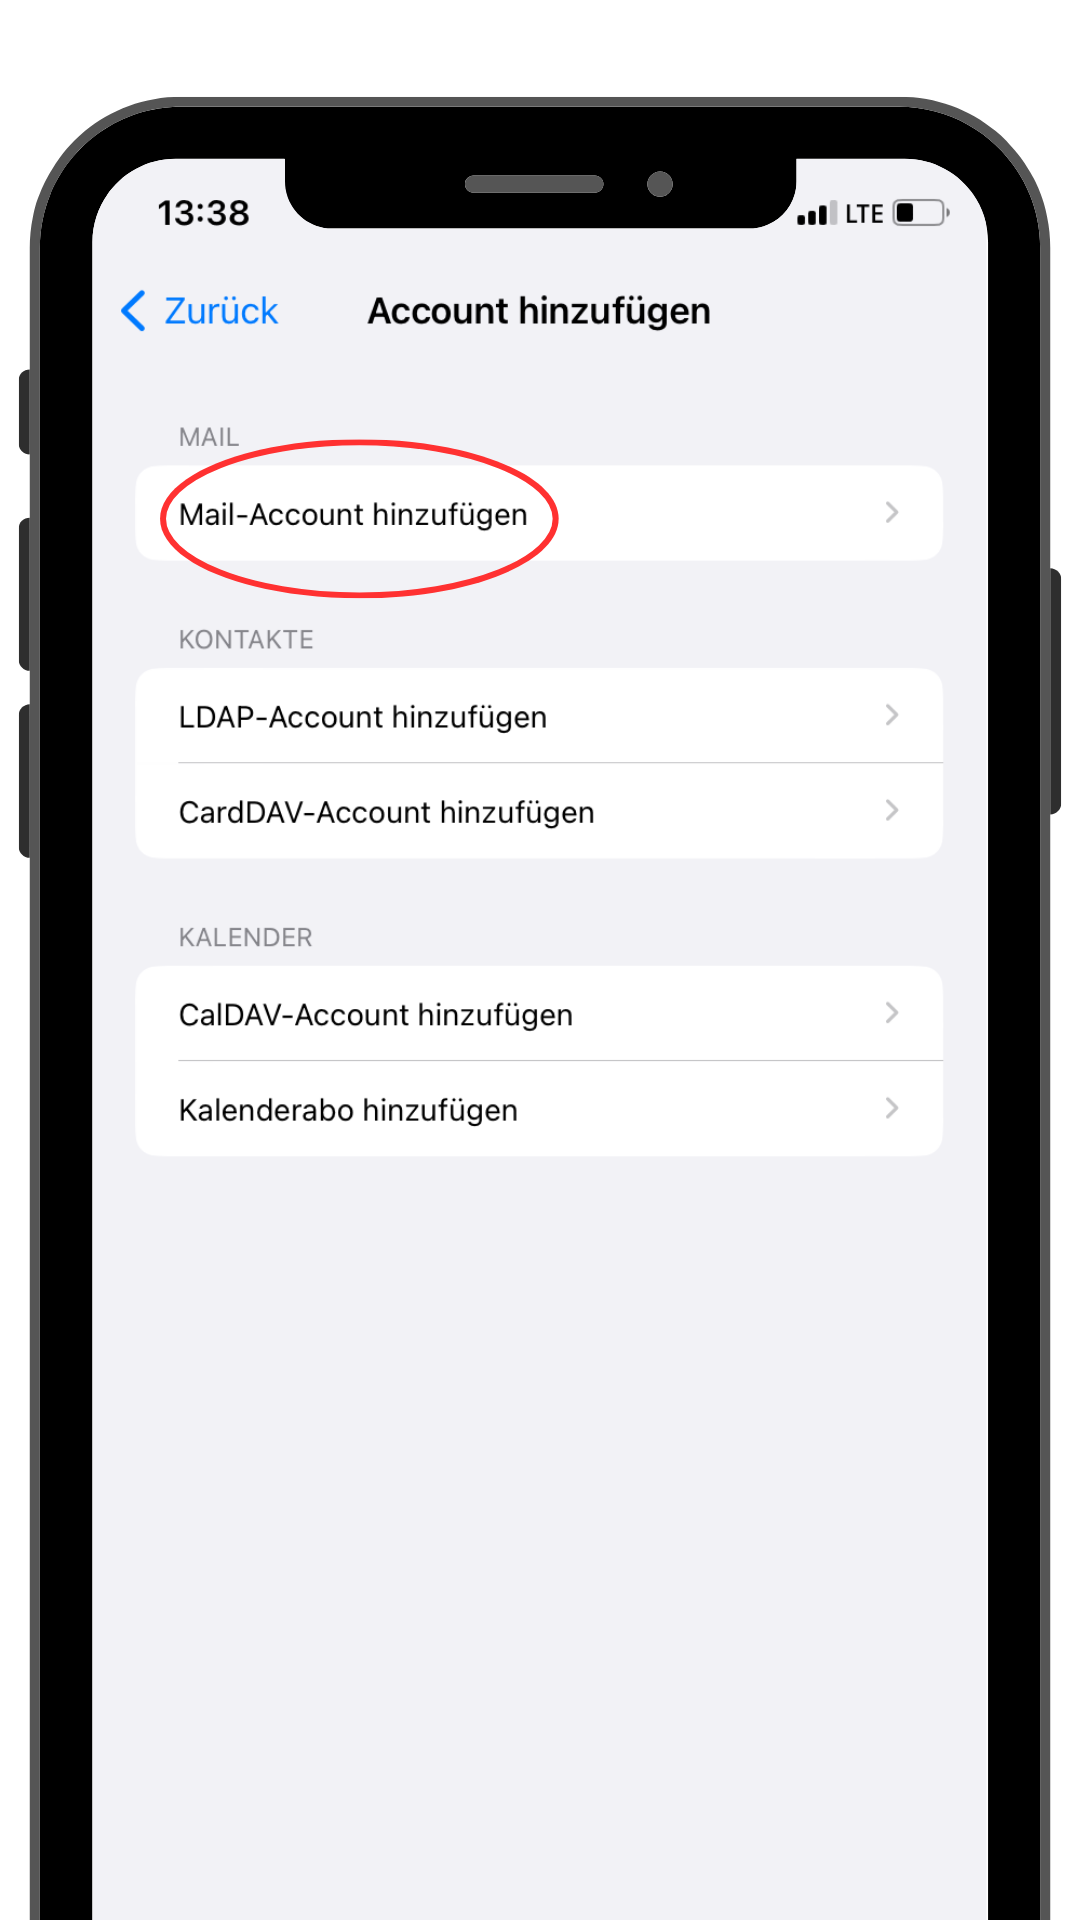
- Enter account information: Enter the following information:
- Name: Your name that will be displayed for outgoing emails.
- E-mail: Your full email address.
- Password: The password for your email account. Password forgotten? Now log into the Hosting Control Panel and set a new password in the Email Manager.
- Description: A description for your account (e.g. “Business email”).
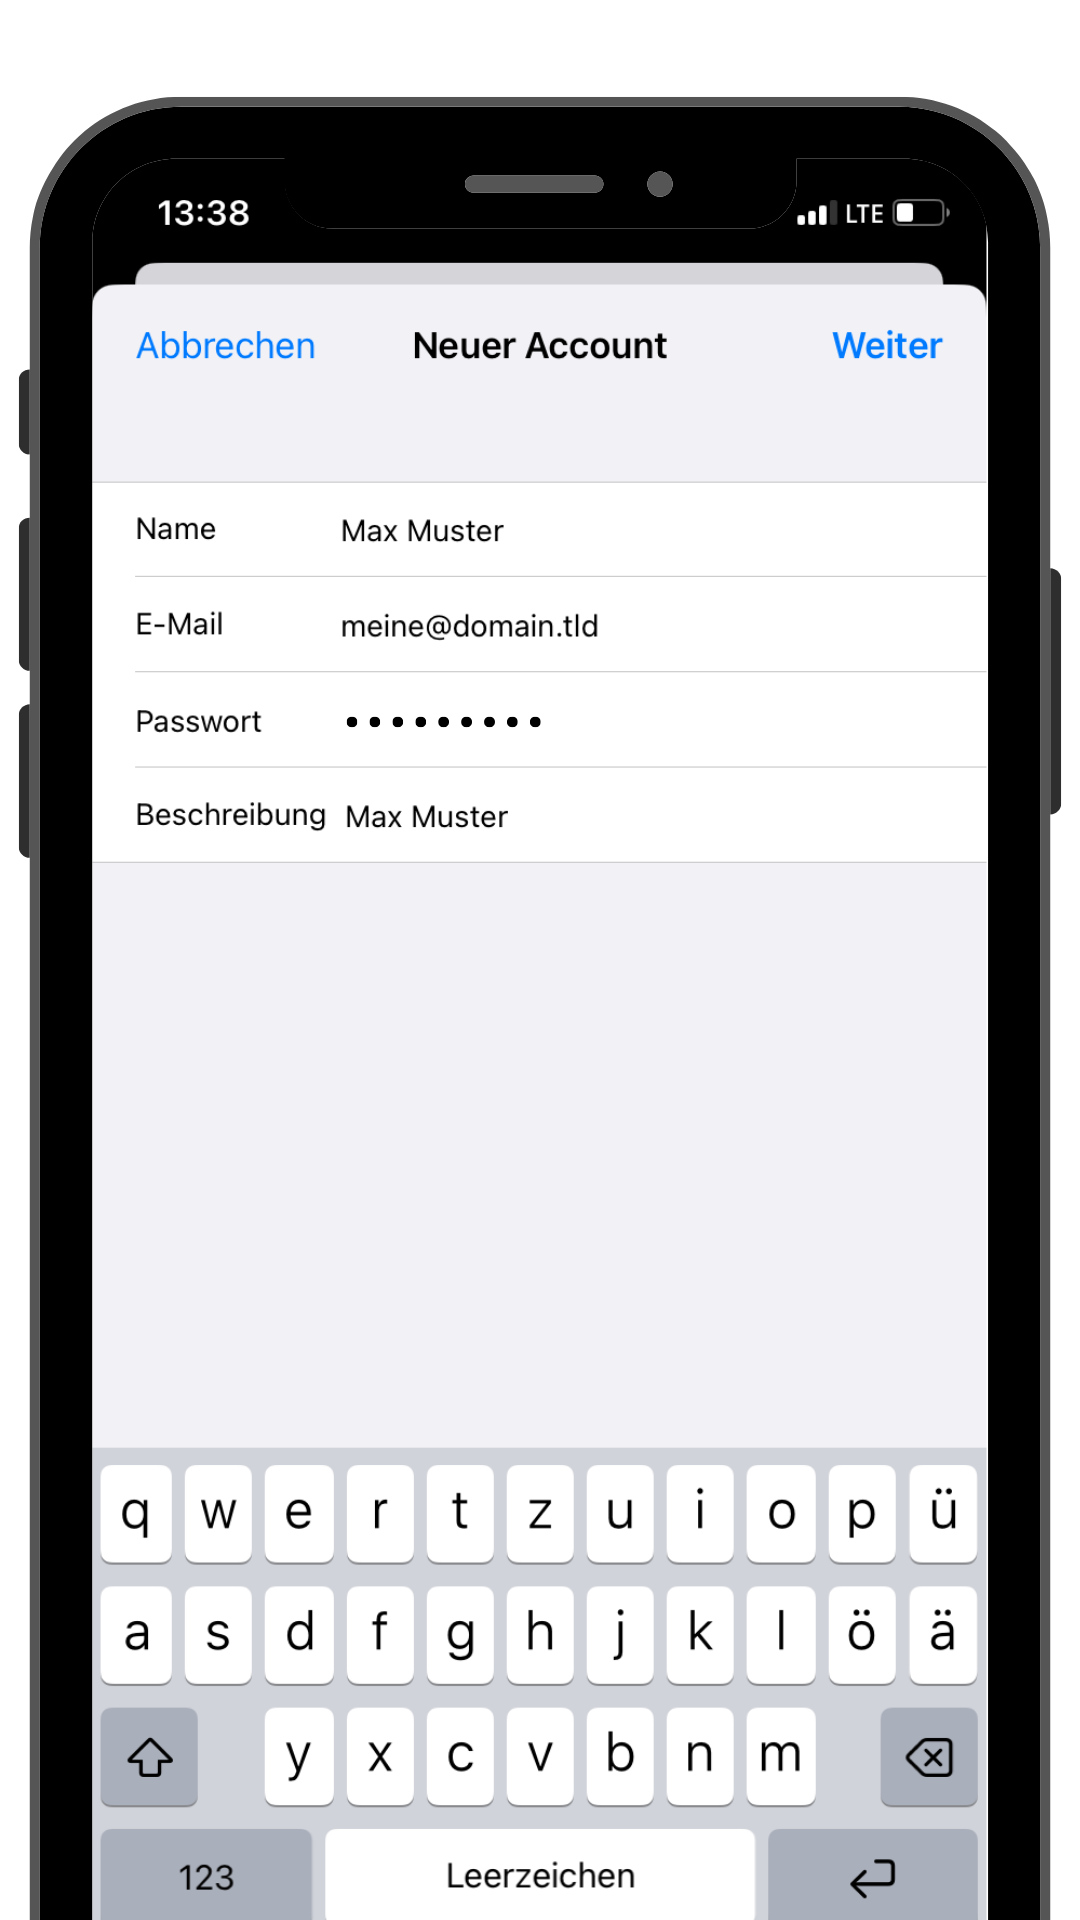
- Next: Tap “Next”.
- Enter server information:
You can get the email settings needed for this step from Internet Tools.
Please note: The settings shown in the screenshot differ from the server data you need!- Incoming email: Enter the IMAP server settings. These include
- the server name(get it here)
- the port (993)
- the encryption method (SSL/TLS)
This information should be provided by your email provider. - Do not enable “secured password authentication (SPA)”.
- Outgoing email (SMTP): Enter the appropriate information for the outgoing server here:
- Server name(get here)
- Port (465)
- Encryption method (SSL/TLS)
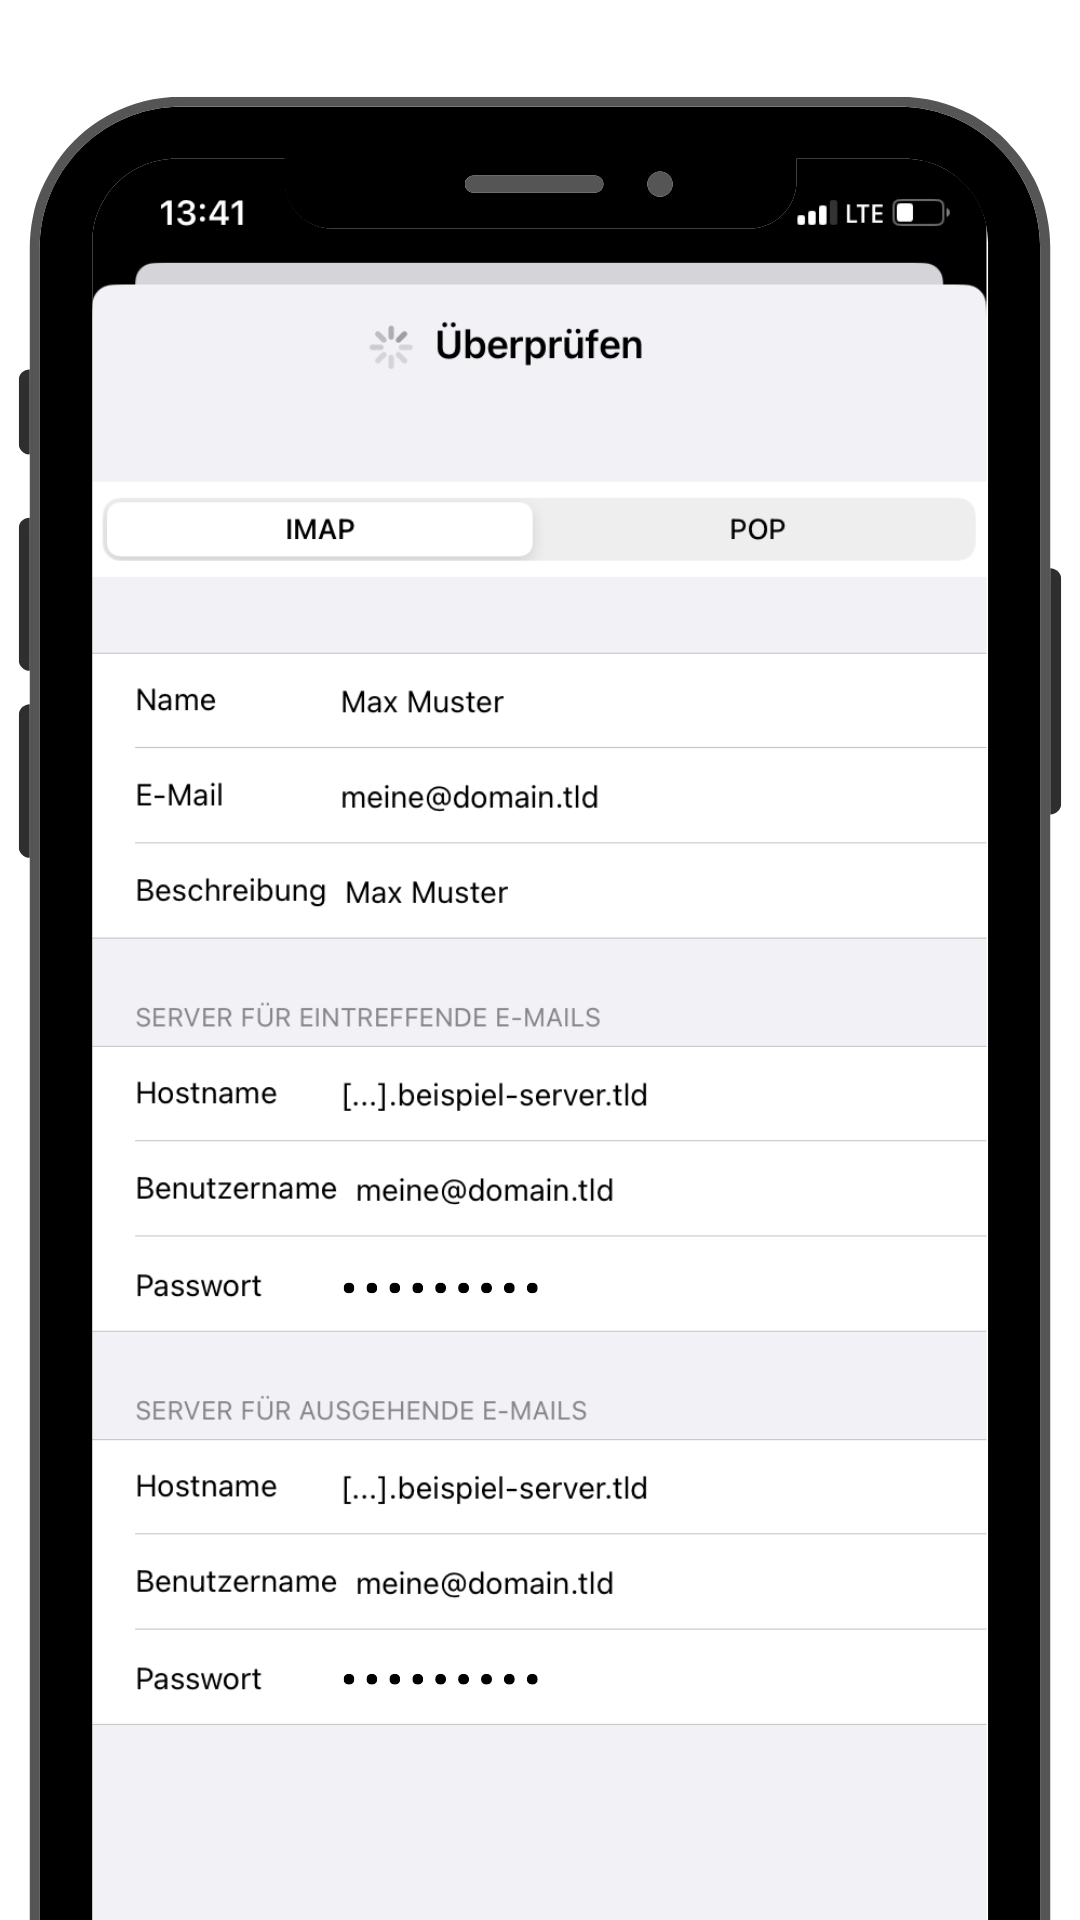
- Incoming email: Enter the IMAP server settings. These include
- Next: Tap “Next”.
- Check server settings: The Mail app will check the server settings. Make sure they are correct.
- Account options: You can configure some settings for the email account here, such as whether you want to synchronize emails, contacts, and calendars. Select the desired options and tap “Next”.
- Confirmation: The mail app will verify the information and add the account. If everything is OK, you will be prompted to save the settings. Tap “Done” to complete the process.
Your IMAP email account should now be set up on your iPhone using the Apple Mail app. You can open the app to access and manage your emails. Please note that the exact steps may vary slightly depending on your iOS version, but these instructions should give you a basic idea of how to set up an IMAP account.
Apple Mail OSX 12 Setup
Apple Mail OSX 12 Setup
Preparation:
Before setting up in Outlook, logging into the webmail for the first time is important. This ensures that the default email directories are created. This ensures smooth functionality in Apple Mail.
To access it, simply type your domain in the browser line and add “/up”. For example: pattern.at/up.
-
Open the“Mail” app on your Mac.
-
Click“Mail” in the upper left corner and select“Settings” from the drop-down menu.
-
In the settings, click on “Accounts.”
-
Click the plus sign (+) at the bottom left to add a new account.
-
Select“Other mail account” and click“Continue“.
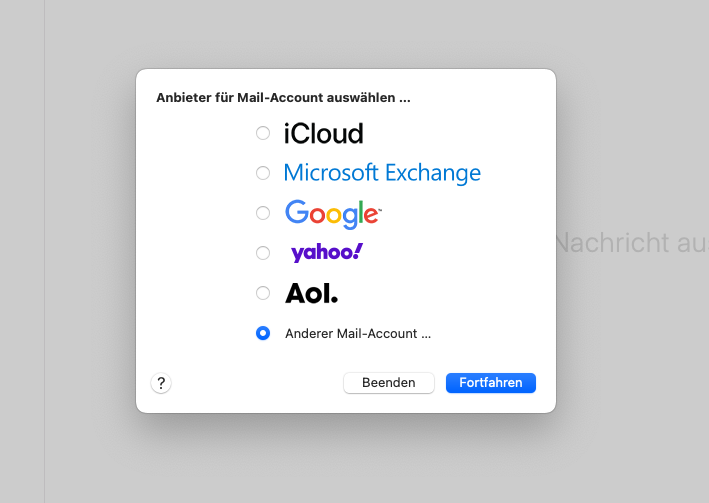
-
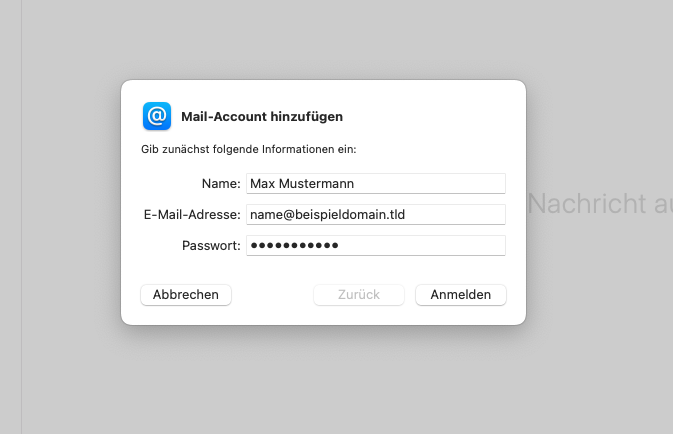
Enter your name, email address and password for your IMAP account.
Password forgotten? Now log into the Hosting Control Panel and set a new password in the Email Manager.Then click Log in.
-
Select“IMAP” as the account type.
You can get the email settings needed for this step from Internet Tools.Please note: The settings shown in the screenshot differ from the server data you need!
- Incoming email: Enter the IMAP server settings. These include
- the server name(get it here)
- Outgoing email (SMTP): Enter the appropriate information for the outgoing server here:
- Server name(get here)
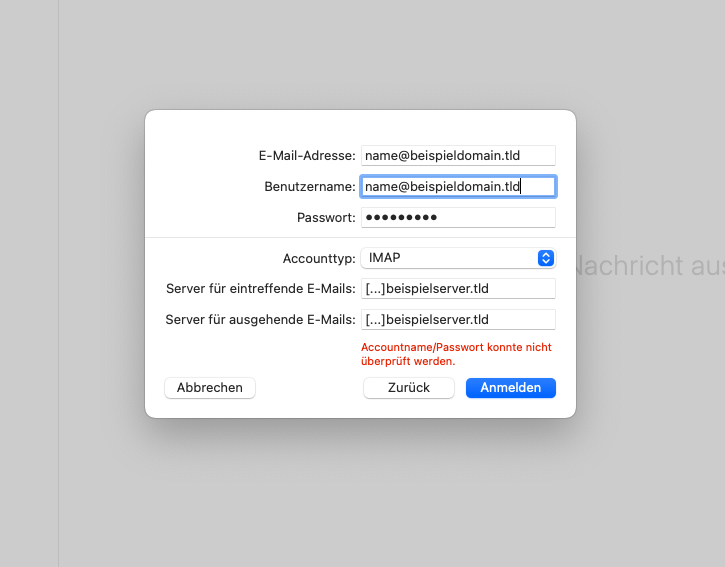
- Server name(get here)
- Incoming email: Enter the IMAP server settings. These include
-
Click Log In
-
Apple Mail will check your settings and set up the account.
-
Check the account settings and adjust the account name and description if necessary.
-
Click on“Done“.
Your IMAP email account is now set up in Apple Mail on macOS 12. You can check and manage your emails. Note that the exact settings may vary depending on your email provider. Make sure you have received the correct server information from your email provider.