Upgrade:
If you require additional storage space, more databases, or email addresses, you always have the option to upgrade your hosting. To do so, follow these steps in the Chillydomains customer area: Log in to your Chillydomains customer area. Navigate to the “Services” menu. Select the “Upgrade” option.
Downgrade:
In your customer area, you can switch to a smaller hosting package by following these steps: Log in to your Chillydomains customer area. > Go to the “Services” menu. Choose the “Downgrade” option.
However, it’s important to note that downgrading is only feasible if the resources you are currently using, such as occupied disk space and the number of databases, are compatible with the smaller hosting package. Before you remove any data from your web space, it is highly recommended to back it up to ensure you don’t lose any important information.
Log in to your customer area. Navigate to the “Order” tab. In the menu on the right side, you will find the option “Order storage package only.” During the ordering process, you can specify the domain for which the hosting package should be set up.
With some hosting packages you have the option to add additional domains via the Control Panel. The best way to find out the number of domains you can add is to refer to the resource usage overview in the Control Panel. However, keep in mind that domains share hosting package resources (such as web space and email accounts).
Step 1: Control Panel – Domains module
- In the Control Panel, switch to the Domains module.
- Click on “Add new domain
- Select which services you want to use
- For “Website” you will then be asked for the root directory of the domain. Either create a new one, or select an existing one.
- Click Add
- For step 2 you will need the IP address of your hosting package. To do this, go to “Action” and “DNS Check” for your main domain. At the bottom you will find the server IP address – make a note of it.
Your domain is now assigned to the storage package. Now link the two together in your customer center.
Step 2: Customer Center – Adjust DNS settings
- Log in to your customer area
- Switch to the “Services” menu item and select “DNS service 1 year for yourdomain.tld” and “Edit zone entries” here
- Now enter the IP address of your hosting package.
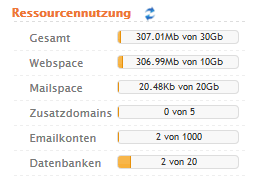
In your Control Panel, on the right side, you will find information about all the resources used by your web hosting package.
You will get an overview of the total storage used by your hosting package, including web storage and email storage space. Moreover, you can view the number of available and used additional domains, email accounts and databases.
In your customer center, first navigate to “Order”, then select “Order storage package only”.
In the further course of the order process, you can enter the domain of your choice for which the desired storage package is to be set up.